How to Completely Wipe and Reinstall Windows 11
Reinstall Windows 11 completely with this guide. Learn to wipe your PC, create installation media, and perform a install for optimal performance.
Windows 11 can slow down over time due to accumulated files, software conflicts, or malware infections. If your system is underperforming or you’re preparing to sell your device, learning how to completely wipe and Reinstall Windows 11 is the best way to restore peak performance. This process removes all data, corrupted system files, and potential security threats, giving you a fresh start with a clean operating system.
Before proceeding, it’s crucial to back up your important files to avoid permanent data loss. Whether you use an external drive, cloud storage, or a system image tool, safeguarding your data ensures a smooth transition. This guide will walk you through every step from creating installation media to Reinstall Windows 11 drivers so you can wipe and reinstall Windows 11 safely and efficiently. Follow these instructions carefully for optimal results.
How to Completely Wipe and Reinstall Windows 11
Back Up Your Important Data
Before wiping your system, backing up your files is crucial to prevent permanent data loss. Use an external hard drive, USB flash drive, or cloud storage like OneDrive or Google Drive to save documents, photos, and other personal files. For a full system backup, use Windows Backup and Restore or third-party tools like Macrium Reflect or EaseUS Todo Backup. This ensures that even your installed programs and settings can be restored if needed.
Create a Windows 11 Installation Media
To Reinstall Windows 11, you’ll need a bootable USB drive with the installation files. Download the Windows 11 Media Creation Tool from Microsoft’s official website and run it. Follow the prompts to create installation media on a USB drive with at least 8GB of storage. Ensure your USB is formatted correctly (NTFS) and that your PC’s BIOS/UEFI supports booting from USB. This step is essential for a clean installation.
Access Windows 11 Recovery Options
To begin the Reinstall Windows 11 process, restart your PC and enter the Windows Recovery Environment (WinRE). You can do this by holding Shift + Restart or pressing F11/F12/DEL during boot to access the BIOS/UEFI menu. From here, select Troubleshoot > Reset this PC > Remove everything. This initiates a factory reset, but for a complete wipe, proceed with a clean install using the bootable USB.
Boot from the Installation Media
Insert the bootable USB and restart your PC. Enter the BIOS/UEFI settings (usually by pressing F2, F12, DEL, or ESC) and set the USB as the primary boot device. Save changes and exit. The Windows 11 setup will load. Select your language, time format, and keyboard layout, then click Install Now. Enter your product key (if required) or skip it for activation later.
Delete Partitions for a Clean Install
In the installation setup, choose Custom Install Windows only (advanced). You’ll see a list of partitions—select each one and click Delete to remove all existing data. This ensures a completely clean install by erasing all previous system files, malware, and bloatware. After deletion, select the unallocated space and click Next to proceed.


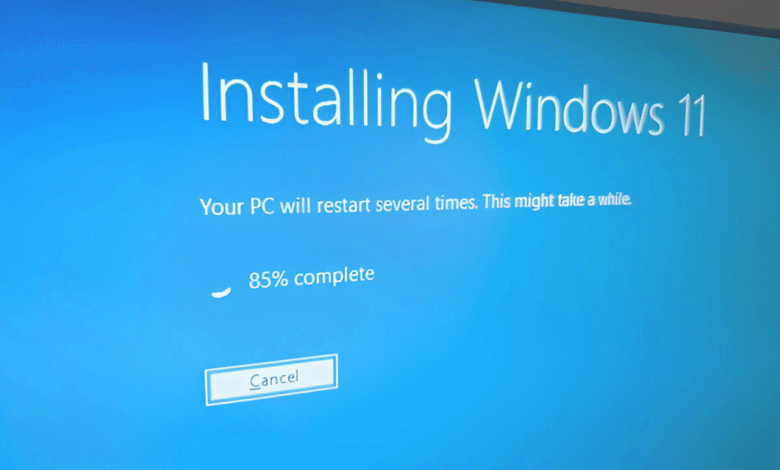
Complete Windows 11 Installation
Windows will now install on your PC. The process may take 20-40 minutes, depending on your hardware. Once done, your system will restart, and you’ll be guided through the OOBE (Out-of-Box Experience) setup. Configure your region, keyboard layout, and Microsoft account (or create a local account). Enable or disable privacy settings as per your preference.
Install Drivers and Updates
After installation, check for missing drivers in Device Manager. Download the latest chipset, graphics, and network drivers from your PC manufacturer’s website or Windows Update. Run Windows Update multiple times to ensure all security patches and performance improvements are installed. This prevents compatibility issues and enhances system stability.
Restore Your Backed-Up Files
Once your system is updated, transfer your backed-up files from your external drive or Cloud storage. Reinstall essential applications and customize settings to your preference. Avoid restoring old system files that may carry malware or corruption. Instead, manually Reinstall Windows 11 programs for a fresh and optimized experience.
Optimize Windows 11 for Performance
Disable Unnecessary Startup Programs
Too many apps launching at startup can significantly slow down your boot time and system performance. Open Task Manager (Ctrl+Shift+Esc), navigate to the Startup tab, and disable programs you don’t need immediately. This reduces background processes, freeing up RAM and CPU resources for better responsiveness.
Adjust Power Settings for Maximum Performance
Windows 11 defaults to Balanced power mode, which limits performance to save energy. Switch to High Performance mode by going to Settings > System > Power & battery > Power mode. For desktops, access Control Panel > Hardware and Sound > Power Options and select Ultimate Performance (if available) for optimal speed.
Enable Storage Sense to Free Up Space
Storage Sense automatically cleans temporary files, downloads, and old system files. Activate it in Settings > System > Storage > Storage Sense and configure it to run weekly. This prevents storage bloat, which can slow down read/write speeds and overall system efficiency.
Update Drivers and Windows Regularly
Outdated drivers and system files can cause lag and compatibility issues. Check for updates via Settings > Windows Update and visit your hardware manufacturer’s website for the latest drivers. Regular updates patch security vulnerabilities and improve system stability.
Defragment HDDs (Not SSDs)
If you use a traditional hard drive (HDD), occasional defragmentation can improve file access speeds. Search for “Defragment and Optimize Drives” in the Start menu, select your HDD, and click Optimize. Avoid this for SSDs, as it can reduce their lifespan.
Disable Visual Effects for Faster UI
Fancy animations and transparency effects consume GPU resources. To disable them, search for “View advanced system settings”, go to Performance Options > Visual Effects, and select “Adjust for best performance”. This makes the interface snappier, especially on older hardware.
Scan for Malware and Bloatware
Malware and pre-installed bloatware can hog system resources. Run a full scan with Windows Security (Defender) and uninstall unnecessary apps via Settings > Apps > Installed apps. For deeper cleaning, use tools like BloatBox or Revo Uninstaller.
Manage Virtual Memory (Page File)
Windows uses virtual memory when RAM is full. To optimize it, go to Advanced system settings > Performance Options > Advanced > Virtual Memory. Set a custom size (1.5x your RAM) or let Windows manage it automatically for smoother multitasking.
Clean the Registry (Advanced Users)
Corrupted registry entries can cause slowdowns. Use trusted tools like CCleaner or Wise Registry Cleaner to fix errors. Proceed with caution back up the registry first, as mistakes can destabilize your system.
Upgrade Hardware if Needed
If performance issues persist, consider upgrading your RAM (16GB recommended) or switching to an SSD for faster boot times and file access. Hardware upgrades often provide the most significant performance boost for aging systems.
Read More: How to Speed Up Your MacBook Without Extra Software
Conclusion
Completely wiping and Reinstall Windows 11 is one of the most effective ways to restore your PC’s performance and eliminate persistent software issues. By following the steps outlined in this guide, you’ve ensured a fresh, clean installation free from bloatware, corrupted files, and potential security threats. Remember that this process permanently erases all data, so always verify your backups before proceeding.
With your newly Reinstall Windows 11, your system should now run faster and more reliably. To maintain optimal performance, be sure to regularly update drivers, run Windows Update, and practice good digital hygiene. Should you encounter any difficulties during the process, Microsoft’s official support resources and community forums can provide additional assistance for troubleshooting. Enjoy your refreshed computing experience.
FAQs
Will Reinstall Windows 11 delete all my files?
Yes, a clean install erases everything on the system drive. Always back up important files to an external drive or cloud storage before proceeding.
Do I need a product key to reinstall Windows 11?
If your PC was previously activated, Windows will auto-activate after reinstallation. Otherwise, you may need to enter your product key during setup.
How long does it take to reinstall Windows 11?
The process usually takes 30-60 minutes, depending on your hardware speed and whether you’re installing updates and drivers afterward.
Can I reinstall Windows 11 without a USB?
Yes, you can use Windows Recovery Environment (WinRE), but a bootable USB ensures a cleaner and more reliable installation.
Will Reinstall Windows 11 improve performance?
Yes, a fresh install removes bloatware, malware, and corrupted files, often making your PC faster and more stable.